Followers

Showing posts with label computer. Show all posts

Tuesday 6 October 2020

Razer Ornata V2 Gaming Keyboard: Review


Razer Ornata V2 Gaming Keyboard: Review


Razer keyboards have been in the market for several years. They have produced some commendable gaming keyboards in all these years, and now, they are back with their latest Razer Ornata V2 Gaming Keyboard. The world’s leading gaming brand claims it to be a hybrid keyboard because it features a hybrid switch that merges the benefits of membrane keys and mechanical switches into one singular design. It brings the best of both the world and ensures a rapid response and natural click on the keys. This mecha-membrane keyboard has an integration with the Razer Chroma RGB to keep your fingertips powered during extended gameplay sessions.

The mecha-membrane switch fuses the snappy, clicky feedback of a mechanical control with a similar, cushioned feel of a conventional keyboard. The cushioned keyboard allows you to glide through the sentences smoothly. It also ensures that each keystroke you make on the Razer Ornata V2 is as satisfying as it is precise. Like a regular keyboard, it also has controls that can be configured to pause, play, skip, and tweak everything from brightness to volume. You can find the media keys on the top-right side, and it also features a volume roller so that you can tweak the volume within seconds. The volume roller will let you enjoy your game without breaking your attention from the computer screen.


You can easily customize the media and other essential keys according to your gaming preferences. You can even remap the keys to create gaming shortcuts and combinations for a faster and smarter move on the virtual battlefield. Razer Ornata also enables you to customize between different setups, and you can instantly switch between them. You can even customize the volume roller. There is LED lighting underneath the keys that makes it look better and gaming ready. Some users might find the keys placed too close to each other, but it isn’t as bad as regular laptop keyboards. Typing and punching anything on the keyboard will not produce any sound, so you can play games in the middle of the night without disturbing your roommate.

The Razer Ornata V2 Gaming Keyboard has a commendable routing management system so you won’t have any trouble while routing and positioning the cables in any direction. You wouldn’t have to change your entire gaming setup due to this keyboard. It also includes a large and detachable wrist rest. So, you can (de)attach it to your keyboard via a magnetic connection. The rest of the area is adequately padded and has a faux leather finish to it.

The keyboard will unquestionably make your gaming sessions more comfortable and let you smoothly operate your moves with its hybrid keyboard. Although it is still debatable if this keyboard improves your gaming skills, one cannot deny the power its hardware holds. Despite having such unique features, this keyboard is not for everyone. You can use it for your regular desk job, but it isn’t going to be as comfortable and easy due to the cushioning. But overall, it is a great purchase to make as you will get up to 2 years of warranty along with access to their reliable tech support. We would recommend you to purchase directly from RazerStore to get 14-days risk-free returns.


Source:-  Razer Ornata V2 Gaming Keyboard

Thursday 24 September 2020

Want to Delete a User on Mac? Here’s How to Do It.


Want to Delete a User on Mac? Here’s How to Do It.


If you use a Mac computer, you can create multiple user accounts on it to make it accessible for the other people. This is an excellent feature for those users who let other people use their computers. If your Mac computer is used by other family members, then you can easily create separate user accounts for them. But, what if you want to delete any user? How can you remove a user from your Mac computer? Well, the reason for deleting any user on your Mac can be anything. Maybe you don’t need that user account, or it may be because of some security proposes. Whatever the reason is, removing any user account on a Mac is pretty straightforward. You can accomplish this task within a few minutes. And it’s completely fine if you do not know the procedure. Now, we are here to guide you. 


The following article will let you know the way through which any Mac user can delete any user account on their computer. Here, we have mentioned the full procedure to complete the task. So, go on and read the complete article to have the full details. 

The Method to Delete a User on a Mac

The technique to delete a user account on a Mac is quite simple. It is important to manage user accounts on any of your devices to keep your data safe. Well, if you want, you can enable the guest mode on your Mac computer to make it accessible for the other users. The guest mode creates a temporary account for the guest users. You can easily activate the guest mode feature on your Mac computer. So, now, let’s move ahead and see what you need to do to delete any user account on your Mac. Here are the steps:

  • To get started with the procedure, firstly, go to the Apple menu and select the option of “System Preferences”.
  • Now, after reaching the System Preferences screen, you need to click on the option of “users and Groups”.
  • After this, select the “Padlock” icon given in the lower-left corner of your screen.
  • Type your password in the given space and then select the “Unlock” button.
  • And now, go to the left panel menu and click on the user account that you are going to delete. 
  • Then, click on the “Minus” icon that you can see in the bottom left corner of your screen.
  • And then, you will be provided with three options, including:

“Save the home folder as a disk image”, “Keep the home folder unchanged”, and “Remove the home folder”. Choose any of these options as per your preferences.

  • After selecting the appropriate option, lastly, click on the option of “Delete User” to complete the process. 

And that’s all. This way, by following the same steps, you can delete any other user accounts as well. And with this, I hope you will find this article helpful. To stay updated, please stay tuned with us and check out our website.


Source:-  How To Delete a User on Mac?

What to Do If Netflix Is Not Working on Your Smartphone or Computer


What to Do If Netflix Is Not Working on Your Smartphone or Computer

Are you unable to access or use Netflix on your mobile or computer? If yes, then you are in luck because today, we are going to share with you six fixes that you can use to fix this problem so that you can use Netflix on your mobile or computer without any issue.

Make Sure That Netflix Is Not Down

Sometimes you might not be able to access Netflix on your mobile if the servers of Netflix itself is offline or is down for maintenance. To make sure this is not the case, go to https://help.netflix.com/en/is-netflix-down and see if Netflix servers are down or not. If their server is offline, you can’t do anything, and you must wait until the server is online again. However, if the Netflix server is not offline or down for maintenance, then you can follow the other troubleshooting tips of this article.


Restart Your Device

Sometimes the Netflix App itself might be the real culprit if you are unable to access Netflix service on your mobile or computer. Why? Because just like every other mobile or desktop app in the market, the Netflix app is not entirely perfect, and sometimes you might be unable to access Netflix due to a bug of the app. Besides this, you might also be facing this issue due to a technical glitch on your mobile or computer. But by restarting our device, we can quickly get rid of these problems. So, try restarting your device and see if this solves your problem or not.

Check Your Internet

The next thing that you can do if you are unable to access Netflix is to check your internet connection. Make sure that your internet is working correctly and is not down. If you are using mobile internet, then make sure that you have not accidentally enabled airplane mode on your mobile. However, if everything is looking fine, then try using other apps that are on your mobile and see if these apps are also facing connectivity issues just like the Netflix app or not. If these apps are also facing connectivity, then there might be a problem in your internet connection or your mobile’s signal strength might be weak.

Reboot Your Router

If you are facing connectivity issues on all your mobile apps (including Netflix), then there might be some issues with your internet connection. For example, your router might be facing a technical glitch due to which it’s unable to connect to the internet. However, we can quickly solve this problem by rebooting our router. Once you do this, it will refresh your Wi-Fi or internet connection, which may help you get rid of any technical glitch that might be affecting your router’s normal functioning. So, try rebooting your router if you are unable to access Netflix services on your mobile or computer system.

Update the Netflix App

Just like you update your mobile or computer OS to avoid any technical or performance issues on them. You must also update your Netflix app to avoid any connectivity or performance issues on it. Why? Because Netflix app updates are released to fix all identified technical issues or bugs. For example, if you are currently seeing “Error Code UI-800-3” on the Netflix app, then you can fix this problem by updating your app. So, try updating your Netflix if your Netflix app is not working on your mobile or computer system.

Log Out and Login Again

Sometimes you might face issues with Netflix if you have logged into multiple devices (Even if the use of multiple devices is allowed in your Netflix subscription plan). Why? Because it may create conflicts at the backend of Netflix due to which you might not be able to access Netflix on your computer or mobile. However, we can solve this problem by logging out of all devices and then logging in again into our account. To do this:

  1. Go to the Netflix website and log in to your account using your login credentials.
  2. Now, tap on the user icon (located in the upper-right hand corner of your screen).
  3. Next, tap on the “Manage Profiles” option.
  4. After that, tap on the “Sign-out of all devices” option under the “Settings” section.
  5. Finally, log in to your Netflix account again from the device on which you want to use Netflix, and you will be able to access its services on it.

Conclusion

It can be tough to determine the real reason due to which Netflix might not be working on your smartphone or computer system.  But once we identify it, we can quickly fix this problem. So, don’t panic if you are unable to use Netflix on your mobile or computer and try to identify the real cause of this problem so that you can fix this problem quickly and access and use Netflix without any issue or problem.


Source:-   How To Fix If Netflix Is Not Working

Tuesday 22 September 2020

Here’s How You Can Set up Parental Controls on a Chromebook


Here’s How You Can Set up Parental Controls on a Chromebook


Do you have a Chromebook computer that is used by your kids most often? Well, if you want, your Chromebook computer can be turned into a kid-friendly device. We know these devices are pretty useful for every purpose and especially for kids. But, as a parent, you need to make sure that your kids don’t get addicted to these gadgets. And along with that, you should ensure safe internet surfing for your kids. The Internet is a powerful thing on which we all depend largely. We can find all types of content on the World Wide Web. But, in some instances, it can be harmful. These days, most devices come with an inbuilt feature that enables you to monitor your child’s activity. And like all the other devices, Chromebook computers also have this feature, and that is called parental controls. If you are planning to gift a brand new Chromebook computer to your child, then firstly, you need to set some limitations.


Do you want to know how you can enable the parental control settings for your kids on your Chromebook computer? Want some suggestions? However, for this purpose, you can also use some third-party parental controls software on your computer. But when you can use the inbuilt settings, then what is the point of depending on other software. It is possible that you might not know how to set up parental controls on your Chromebook. But, here, you don’t need to worry at all. The following article will let you know the way to complete the task. So, to explore more, you should go through the complete article.

The Method to Set Up Parental Controls on a Chromebook

If you want to set up parental control settings on your Chromebook computer, then you will need to follow a proper procedure. Enabling this setting on your computer is not a difficult task to accomplish. Anyone can easily activate the parental control settings on a Chromebook. To set up the parental controls, firstly, you will need to set up Google Family Link on your Chromebook. And then only, you can activate the settings. This is pretty easy and includes some easy steps. For setting up a Google Family Link, you will need to enter your information. And then you can filter the apps and activities for your kids. You can install the Google Family Link app easily on your computer. Now, let’s see how the method works:

The Steps to Set Up Google Family Link on a Chromebook

Follow the steps mentioned below to help yourself in setting up the Google Family Link on your Chromebook:

  • To start with the procedure, first of all, go to the bottom right corner of your Chromebook screen and click on the “Settings” icon to open it on your computer.
  • And now, select the option of “Advanced” that you can see on the right-hand toolbar. This will open up more alternatives for you.
  • From the drop-down menu, click on the option of “Privacy and Settings”.
  • Go to the “People” section and there, click on the “Parental Controls” option.
  • After this, go to the “Set Up” button.
  • And then, you will see a pop-up window appearing on your screen, here, you will need to click on the blue-colored “Get Started” button. After this, you will be provided with the details describing how to set up the parental controls along with some of its features. Select the “Next” to proceed further.
  • And now, the next window will ask, “Is this the device you want to supervise”. Select the “Yes” button to continue.
  • Go through all the instructions and after that, select the “Next” option.
  • And lastly, log into the parent account, i.e. the Google account that you are going to use to supervise your child. And then, again, click on “the Next” button to finish the process. And don’t forget to enter the passcode at the bottom. And this is it. Now, let’s see the process for setting up parental controls to restrict any apps, websites, and more.

The Steps to Set up Parental Controls

Follow the steps to set up the parental controls on a Chromebook computer:

  • Begin the process by clicking on the “Next” option after linking your accounts.
  • Now, on the next screen, you will see a list of all the apps along with the toggle button beside each app. Review the apps and toggle the switch for the app that you want to allow access for your kid. And then click on “More” to continue with the process.
  • On the next page, set the filters and ratings for each category. For instance, you can set the ratings for apps and games for everyone or specifically for your kids.
  • After making the changes, click on “Ok” and then select “Next” to continue.
  • After finishing the setup process, click on the “Sign Out” option. Here, you can even access the settings to block any websites.
  • And now, go to the “families.google.com” and select the account that you want to supervise.
  • From the toolbar menu on the left corner of your screen, click on the “Website on Chrome” option.
  • And then, visit the “Manage Sites” section and click on the “Only allow certain sites” option.
  • Go through the “Advanced Settings” tab and here, select the “Blocked Sites” option. Here, you will see the sites that you have blocked. And if you want, you can add any websites at any time to the blocked list by clicking on the “+” icon and then type the URL of the site. Click the “Block” option. And that’s all.

So, this is how you can set up parental controls on your Chromebook computer. Try these steps now. And stay tuned with us for more updates like this.


Source:-  Set up Parental Controls on a Chromebook


Thursday 17 September 2020

Here’s How You Can Set Safari as a Default Web Browser on a Mac


Here’s How You Can Set Safari as a Default Web Browser on a Mac


When you set up your new Mac computer for the first time, Safari is the default web browser. Safari is the most commonly used web browser among Apple devices users. But, all the Apple gadgets allow you to use other browsers as well. So, when you install some different browsers on your Mac computer, it automatically becomes your default web browser. It might be fine for some people. But, not all users prefer to use other browsers all the time. After some time, they prefer coming back to Safari. You can easily set other browsers as a default web browser on any of your Apple devices. But, here, the main topic is to make Safari as a default web browser on a Mac computer. Many Mac users don’t know the procedure to set Safari as a default browser. And this article is for those users.


Do you also own a Mac? Want to make Safari as your default browser but don’t know how to do it? If yes, then we have got you covered. Now you don’t have to go anywhere. Here, you will get to know the ways through which you can set Safari as a default browser on a Mac computer. In this article, we have mentioned the procedures to do that. So, go and keep reading the article.

The Methods to Set Safari as a Default Browser on a Mac

There are multiple ways that you can follow to set Safari as a default web browser on your Mac computer. The procedures are easy and include some simple steps that you can easily follow. Here, we have mentioned the two different methods that you can apply. So, here’s how the procedures work. Let’s start with the first method.

Method 1: Setting the Default Browser on a Mac Computer through the System Preferences

  • To begin with this method, firstly, turn on your Mac computer and then go to the Apple menu that you can see located in the top left corner of your screen.
  • And now, click on the option of “System Preferences”.
  • After reaching the next screen, go to the “General” tab.
  • And now, click on the “Default web browser” drop-down menu, and from there, choose the option of “Safari” to make it as your Default web browser. And that’s it. This way, you can change your default web browser at any time on your Mac.

Method 2: Changing the Default Web Browser on a Mac from the Browser’s Settings

  • According to this method, firstly, you will need to launch the Safari browser on your Mac.
  • And now, go to the browser’s menu and then select the option of “Preferences”.
  • After this, select the “General” tab and click on the “Set as Default” option.
  • Click on the option “Use Safari” to confirm the changes.

So, these were the two most straightforward methods to set Safari as a default browser on a Mac computer. Try any of these methods and let us know if you face any issues. And for more information like this, please stay connected to us and visit our website.


Source:-  How To Set Safari as a Default Web Browser on a Mac

Guide to Set Up Your Xbox One Controller with Windows 10 PC


Guide to Set Up Your Xbox One Controller with Windows 10 PC


Microsoft’s Xbox One controller is one of their most sought-after products. It is an excellent controller that will enhance your gaming session experiences. It makes it easy to play and brings fantastic controls on your fingertips. You can connect the controller with cables or use it wirelessly on your Windows PC. These controllers have long-lasting batteries that are better than any other gaming console’s controller. It offers less latency during heavy fighting games. But connecting them can seem like a task, especially if you’re new into the gaming world. To help you out, we have mentioned all the different ways that you can use to connect your Xbox One controller to your PC and steps to configure it:


Ways to Connect the Controller

There are various ways you can use to connect the Xbox One controller with your PC, but it mainly depends if you want to use cable or go wireless. Following are the methods you can use:

Use a USB Cable

Your controller comes with a micro-USB cable so that you can create a wired connection. Start by plugging the USB cable into your computer and plug the other end into the front of your controller. The connection will be established, and charging will instantly begin. Remember that you’ll have to do this every time you need to charge your controller. 

Use a Wireless Adapter

This method will help you connect the controller wirelessly, but before that, you’ll need an Xbox One Wireless Adapter for Windows 10. You might find this adapter in the package of your controller. If not, you can purchase it separately. Note that this is different from the adapter for the Xbox 360 controller. 

After purchasing the Wireless Adapter, plug it into a USB port on your computer. You may need to use the USB extender (included in the package) depending on how far the port is at the back of your computer. Then, hold the Xbox button on your controller to turn it on, and press the button on the adapter. Now, press the bind button on your controller. The LED on your controller will start blinking. In the meantime, it will begin searching for a connection and will stop flashing once the connection gets established.

Use Bluetooth

This method is for those who have Bluetooth support on their Xbox One controller. To check if your controller has Bluetooth support, check the surrounding of the Xbox logo on the controller. If it is similar to the plastic as the controller, i.e., without seams, then it supports Bluetooth. If you find a separation between the face of the controller and the logo, then it doesn’t support Bluetooth. Here are the steps to pair your devices together:

  1. Go to the Settings of your PC and click on Devices.
  2. Select Bluetooth & other devices, and switch on the toggle for Bluetooth so that it can search for available devices.
  3. Now, click on Add Bluetooth or Other Device and select Bluetooth.
  4. Press the Xbox logo on your controller to turn it on, and press the bind button located at the top.
  5. The Xbox Wireless Controller will appear on your device listing. 
  6. Click on Pair to establish a connection.

Xbox Controller Management and Configuration

Before going any further, you must download the Xbox Accessories app from the Microsoft Store to get the most out of your controller. Following are the list of things you can do on the app to manage and configure your controller:

Update Your Xbox Controller

By default, Windows 10 comes with the relevant drivers for the Xbox One controller. It helps to update your controller and get all the benefits from the latest firmware. If you experience any issue with your controller, then you should try updating it using the following steps:

  1. Open the Xbox Accessories app and connect your controller with it.
  2. Now, click on the three horizontal dots icon and select the Firmware version. Then click on Update now.

Test the Buttons on Your Controller

If you are doubtful of the buttons on your controller being registered or not, then try testing them with the Xbox Accessories app. Start by clicking on the Beaker icon. Now you can press the buttons, pull the triggers, and move the sticks on the controller. If the controller works fine, then you’ll see a corresponding icon appearing next to ‘Button Pressed.’ If not, then your controller might be faulty.

Steps to Successful Calibration

Your controller will come calibrated in the package, but you can use the Windows calibration tool to adjust or check its responsiveness. Use the following steps carefully:

  1. Open the Start menu, search for ‘joy.cpl,’ and select the Control panel item result. 
  2. The Game Controller window will open. Now, select your controller from the list and click on Properties.
  3. The Test tab will be open from where you can determine the location of your resting thumbstick on the axis.
  4. If you’re not satisfied, switch to the Settings tab and click on Calibrate. Follow the instructions carefully to calibrate the controller.
  5. You can reset everything to the original state by clicking on ‘Reset to Default’ from the Settings tab.

This guide will help you use your Xbox One controller without any issue. If these don’t help or your controller fails to respond, then get it checked from an expert.


Source:-  Set Up Your Xbox with Windows 10 PC

Wednesday 16 September 2020

Here’s How You Can Schedule a Scan in Microsoft Defender Antivirus on Windows 10


Here’s How You Can Schedule a Scan in Microsoft Defender Antivirus on Windows 10

The Microsoft Defender Antivirus scans your computer system regularly to make it free from malware and viruses. And for the better functioning of all your devices, it is essential to scan them from time to time. Microsoft Defender Antivirus works pretty well to protect your PC from all the viruses. It scans your computer when you are not using it. And if you want, you can also manually scan your computer system. Or you can schedule a scan as per your requirements. Many people do not know how to schedule a scan for their PC. If you are also one of them and want to know how to schedule a scan in Microsoft Defender Antivirus, then you have arrived at the right page. Anyone can easily schedule a scan on their Windows 10 computer. And this article will let you know how to do so.


In the following article, we have mentioned the technique that will help you to schedule a scan in Microsoft Defender Antivirus on your Windows 10 desktop. So, to get to the method, please go through the complete article.

The Method to Schedule a Scan in Microsoft Defender Antivirus on Windows 10

To schedule a Microsoft Defender Antivirus scan on your Windows 10 PC, you will need to follow the procedure that we have mentioned in this article. This task is easy to accomplish and includes some simple steps that you should follow. So, here’s what you need to do to proceed with the method:

  • Firstly, open the Run command on your computer by pressing the “Windows + R” keys. In the search box, type “taskschd.msc” and hit the search button to open the Task Scheduler.
  • After this, you will have to expand the Task Scheduler Library and then go to Microsoft > Windows folder given in the left pane of the Task Scheduler.
  • And now, select the “Windows Defender” folder.
  • Next, you need to double click the “Windows Defender Scheduled Scan Task” that you can see in the middle pane of the Task Scheduler.
  • Go to the “Triggers” tab and then select the “New” option.
  • And now, create a new trigger by selecting the option of “On a Schedule” given in the “Begin the Task” drop-down menu.
  • Select the time for the scan as per your preferences and then click on “Ok”. 
  • If you want to delete any scheduled task, you can do that by clicking on it and selecting the option of “Delete”.
  • And now, select the “Conditions” tab or select the “Power” settings. And finally, complete the task by clicking on the “Ok” option.
  • Once you are done with the procedure, close the Task Scheduler window.

So, now, you know how to schedule a scan in Microsoft Defender Antivirus on your Windows 10 computer. Take some time and follow the procedure to ensure the protection of your PC. And visit our website to read more articles like this.


Source:-  Microsoft Defender Antivirus on Windows 10

Monday 14 September 2020

Want to Enable Dark Mode on Your Windows 10 Computer? Here’s How to Do It.


Want to Enable Dark Mode on Your Windows 10 Computer? Here’s How to Do It.


Dark Mode has now become a common feature that you can find in almost all the applications and devices. It is a great feature that helps the users to reduce eye strain, and it also gives a sleek look to your devices. Along with this, it also saves the battery on your devices. In today’s time, we all spend plenty of our time using our devices for different purposes. And somehow, it affects our health badly and especially our eyes. So, in this case, it becomes quite essential to enable the Dark Mode on our devices. Enabling this feature on smartphones follows a different procedure as compared to doing it on the computer systems. And not all operating systems support this functionality. But, if you use the Windows 10 operating system on your computer, then luckily, you can activate this feature.


Windows 10 has always been one of the most popular and commonly used operating systems among its users. The main reason for its popularity is the features that it provides to its users. And if you are also one of its users and are here to know the procedures for enabling the dark theme on your Windows 10 computer, then luckily, you are on the right spot now. Here, in our following article, we have mentioned the techniques that you will need to follow to enable the feature. So, to know more in this regard, please keep reading the article.

Enabling the Dark Mode on Windows 10 Computer

There are a lot of Windows 10 users who do not know the methods to enable the Dark Mode on their computer. The Dark Mode is a setting that turns the bright white screen of your device a little dark so that it’s easier to work with them. When you enable this setting, most of the apps and features on your device will have a white text with a black or grey background. Activating this feature on your Windows 10 computer is not any complicated task to accomplish. It follows a much easier way to do so. To provide you with a better understanding of the method, we have mentioned the procedure step-by-step. And to enable the Dark Mode theme on your Windows 10 computer system, you must go through the following steps. The whole process will not take much of your time.

So, if you want to enable this setting on your Windows 10 computer, please take a look at the below-mentioned steps:

Steps to Turn on the Dark Mode on Windows 10

Here are the steps to enable the Dark Mode on Windows 10 computer:

  • To start enabling the setting, first of all, you will need to click on the “Start” button on your computer. And then select the option of “Settings”.
  • On the Settings screen, select the “Personalisation” option.
  • Now, go to the left pane and click on “Colours”. Here, you will find two Dark Mode settings to enable. You can choose any of them as per your choice.
  • After reaching the “Choose your default app mode” section, you will need to select the option of “Dark”. After this, the Dark Mode will be enabled for many basic settings.
  • And now, go to “Choose your default app mode” screen and click on “Dark”. This will automatically activate the Dark Mode in many apps.

Steps to Turn on the Dark Mode for any Specific App on Windows 10 Computer

If you have turned on the Dark Mode on your computer, but find that some apps don’t turn dark, then you can enable the setting for any specific app. Here’s how this works:

  • For instance, if you want to turn on the Dark Mode in Microsoft Office apps, open any app like Word, Excel, or Powerpoint.
  • And then, go to the “File” tab and click on “Options”.
  • There, in the “General” tab, click on the section “Personalise your copy of Microsoft Office”.
  • Go to the drop-down menu and select the “Office Theme” option.
  • After this, you will be provided with two options, including “Dark Grey” and “Black”. Click on any of the options.
  • Save the settings by clicking on the option of “Ok”. And that’s all.

So, this way, you can activate the Dark Mode on your Windows 10 computer. Take some time and try these procedures to personalize your experience. And to stay updated, please visit our website.


Source:- Enable Dark Mode on Your Windows 10

Monday 7 September 2020

Best All-In-One Desktops You Should Know About


Best All-In-One Desktops You Should Know About


All-in-one desktops are easy to set up and have a versatile design which also saves a lot of space. These desktops run on major operating systems such as Windows 10, macOS, and Chrome OS, giving you a variety of options to choose from. The easy setup of all-in-one desktops makes them convenient to use at home for office purposes while working from home and their amazing screens and wonderful sound make these desktops usable for playing games and streaming movies. In this article, we are going to look at the best all-in-one desktops available in the market. Let’s scroll through the list.


HP Pavilion 27 All-in-One Desktop Computer


HP Pavilion 27 All-in-One Desktop Computer is one of the best all-in-one desktop computers available in the market. This elegantly designed desktop comes with an ultra-thin 27-inch touch screen display. The performance of this desktop is more than amazing with 10th-generation Intel Core i7 and 16 GB of RAM only adds more to the smooth performance, allowing you to run multiple software at the same time without facing any glitches. The graphics card in this desktop is Intel UHD Graphics 630 which gives you an amazing experience. 1TB internal memory, four USB-A 3.1 ports, USB-C 3.1 port, two HDMI ports (input and output), and media card reader, Bluetooth 5.0, stereo speakers by B&O, retractable webcam, bundled wireless keyboard, and mouse are some other notable features of this desktop. You can get this amazing desktop for $1,899.99.

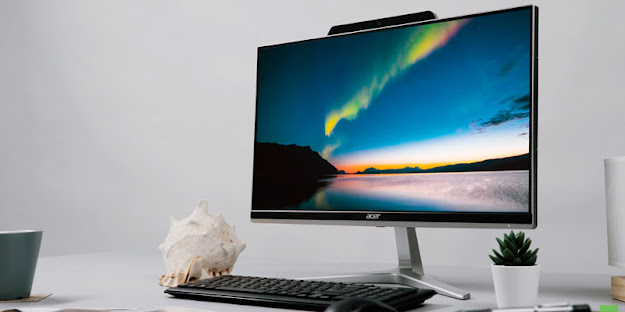
Acer Aspire Z24 All-in-One Desktop Computer


Acer Aspire Z24 All-in-One Desktop Computer comes packed with all the essential features of an amazing all-in-one desktop and the best part about this product is that it fits easily in your budget if compared with other products in the list. This desktop has got an elegant design, respectable hardware, and reliable performance. It comes with a 23.8-inch Full HD IPS display which has a wide viewing angle and is designed in a way to protect your eyes from blue light and flickering. Although it is not a touch display in the given budget. It looks really attractive with a slim top and side bezels. If we talk about the performance, this desktop is powered with a Ninth-generation Intel Core i5 (six-core) processor which gives a smooth experience and 8 GB of RAM adds to its seamlessness. There is also a space of 512 GB in internal memory to keep your data stored for a long time. Three USB-A 3.1 ports, USB-C 3.1 port, two HDMI ports (input and output), SD card reader, full HD webcam, built-in DVD writer, stereo speakers, bundled wireless keyboard and mouse are some other notable features coming for $979.00 only.

Apple iMac All-in-One Desktop with 5K Retina Display


Apple is popular for offering different ranges of amazing desktops and the latest 27-inch iMac with 5K Retina display is one of them. This elegant all-metal body computer with powerful hardware is powered with a 10th-generation Intel Core i5 (six-core) processor for a seamless experience and 8 GB of RAM allows you to run multiple apps at the same time.  It comes with a Radeon Pro 5300 graphics card that gives you a more than the awesome experience of gaming on a 27-inch 5K display which is its prime attraction. The internal memory of this device is 256 GB and a Magic Keyboard and Magic Mouse 2 are also included with the product. Some other notable features include an upgraded FaceTime camera, four USB 3.0 ports, two Thunderbolt 3 USB-C ports, an SD card reader, and Wi-Fi support. You can buy this desktop with a sharp, bright, and colorful display for $1,699.93.

Acer Chromebase 24 All-in-One Desktop Computer

Acer Chromebase 24 is another pick on the list from Acer. It is going to be a really good choice if you are looking for Chrome OS. The performance of this device is just wonderful with the Intel Core i3 processor (dual-core) and 8 GB of RAM allows you to use it for some heavy gaming and works also. This device comes with a 23.8-inch Full HD IPS touch screen display and as Intel UHD Graphics 620 graphics card is included with this desktop, your experience of watching movies and playing games will be amazing. 128 GB of internal memory should be enough to store some important files in your workspace. Full HD webcam, stereo speakers, bundled wired keyboard and mouse are some other notable features which are offered by the company with this desktop for $854.55.

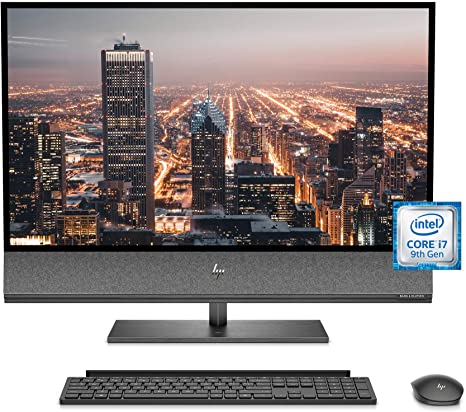
HP ENVY 32 All-in-One Desktop PC


HP ENVY 32 All-in-One Desktop PC is another worth mentioning offering from HP on our list of the best all-in-one desktop. HP ENVY 32 comes with a 31.5-inch 4K IPS display which is very sharp, bright, and colorful. This desktop is powered with Ninth-generation Intel Core i7 CPU (eight-core) and has a RAM of 32 GB along with 1 TB internal storage which makes it one of the best all-in-one desktop in the world. It has an advanced NVIDIA GeForce RTX 2060 graphics card to give you an awesome experience of using this PC. Features like Bang & Olufsen speakers, retractable Full HD webcam, built-in smartphone wireless charger, bundled wireless keyboard, and mouse add more to the premium offerings of this desktop. This desktop costs $2,459.99 and must be considered for buying. All-in-one desktops make it easy to work and the experience of using these desktops is more than awesome. In this article, we have listed the best all-in-one desktops available in the market which you can consider buying.    


Source:-   Best All-In-One Desktops

Wednesday 2 September 2020

Step-By-Step Guide to Install Chrome OS on Virtual Machine


Step-By-Step Guide to Install Chrome OS on Virtual 

Machine


Chrome OS has been widely popular ever since its release. Google rolled out Chrome OS for Chromebooks, and the reason behind its success is its simplicity, security, and speed. It mainly focuses on Google Chrome, multiple apps, and unlimited extensions. Many people have been wondering about the performance of the Chrome OS, and now, one can experience the trial of Chromium on their laptop or PC by booting Chrome OS in the virtual machine.

This way you can try and decide if you would be interested in buying Chromium. But Chrome OS can work only with the Chromebook’s hardware, and Google doesn’t allow the operating system to function on the virtual machine. Since Chrome OS is based on an open-source project, the team at Neverware CloudReady found a way to modify the code for booting it in the virtual machine. If you are eager to try it, then use the following guide below:


Virtual Machine was designed to execute a computer program in a platform-independent environment, so it has the potential to run Chrome OS. Currently, Neverware CloudReady is offering a Chrome OS virtual machine application image for VMware, without charging anything in return. So, the first thing you need before trying the Chrome OS is a copy of the VMware Workstation Player – a free virtual machine tool.

Next, you need to install the Chrome OS CloudReady Image for VMware. Now you are ready to head to the next step, i.e., to import the Chrome OS CloudReady Image into VMware. Follow these steps to continue:

  1. Open the VMware Workstation Player and go to Player.
  2. Select File and click on Open.
  3. Go to Chrome OS image and theImport Virtual Machine window will appear on your screen.
  4. Continue with the default options and select Import.  
  5. Once the import procedure completes, you’ll find the entrance to the virtual machine list.

Your fourth step is to “Boot the Chrome OS Virtual Machine”. 

Start with double-clicking the CloudReady-Home virtual machine in VMware. This will start booting the Chrome OS virtual machine. You are most likely to find the “VMware Workstation and Device/Credential Guard are not compatible” message on your screen during the boot process. It is a very common error to appear, and it has links with the Windows Hyper-V. So, to eradicate this issue, continue by disabling the device or credential guard. Here is how to do it:

  1. In the Start menu search bar, type Windows Features and click on a suitable match.
  2. Scroll down the screen and uncheck the Hyper-V box.
  3. Click on OK to save the settings. Then, restart your system.

Please note that switching off the Hyper-V support doesn’t remove the existing Hyper-V virtual machine images. If you continue to find any error on your PC, then use the following steps:

  1. In the Start menu search bar, type “command prompt” and select Open as Administrator.
  2. Copy and paste the following commands:

bcdedit /enum {current}

bcdedit /set hypervisorlaunchtype off

This will stop the Hyper-V supervisor launch from interfering with the Device or Credential Guard. If you want to revert the changes, again open the Command Prompt and select Run as Administrator. Then, insert the following command:

bcdedit /set hypervisorlaunchtype auto

The final step is to “Configure the Chrome OS Virtual Machine Settings”  

The Chrome OS requires an active internet connection for signing in, and the virtual machine has to share the internet connection of the host machine. It may take a few minutes to configure. If the process doesn’t start immediately, follow these steps:

  1. Click on the grey time icon in the bottom right corner. 
  2. Then click on the Wi-Fi configuration icon and select Ethernet.
  3. Click on Next and then hit the Continue option.
  4. Sign into Chrome OS with your Gmail ID, and you’ll be directed to the Chrome OS Home page.

Now, you are free to explore the Chrome OS features on your desktop.  

This guide will help you experience everything in detail but with a few limitations, no matter which operating system desktop you use. Also, you won’t have access to the Google Play Store. This method will not give you an exact copy of the Chromium, but it will bring you closer to Chrome OS. If you are going to use the Chrome OS for a longer period, then check Neverware regularly for updates and don’t turn off the virtual machine.


Source:-  Install Chrome OS on Virtual Machine

My Hero Academia: Who Is Better Between Overhaul and Shoto Todoroki?

  My Hero Academia has several heroes that are powerful enough to rival the strongest protagonists of Shonen anime. Even the prestigious U.A...